Auto-registration
Some screenshots or videos may show an outdated interface. There are no critical changes that affect understanding of the main functions.
The Auto-registrator can be purchased with the full version of UniMessenger or separately. When buying only the Autoreg, two tabs are available: Accounts and Auto-registration.
Before enabling Auto-registration, make sure the right Settings are in place and the Activation services are filled in.
The "Work status" tab shows data for every emulator during registration: Emulator, Status, SMS service, Successful, Error.
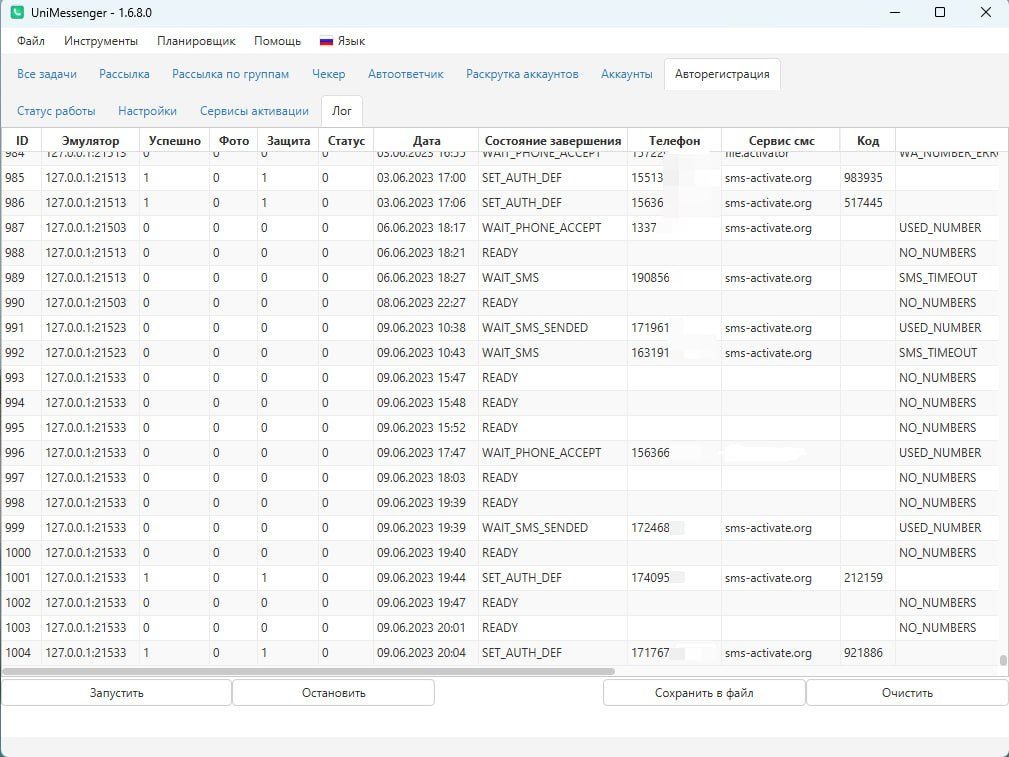
In "Statistics" (before version 1.7.1.9 the tab was called "Log"), registration data is recorded: ID, Emulator, Successful, Photo, Protection, Status, Date, Completion state, Phone, SMS service, Code, Error, SMS check.
For explanations of Auto-registration statuses, see here.
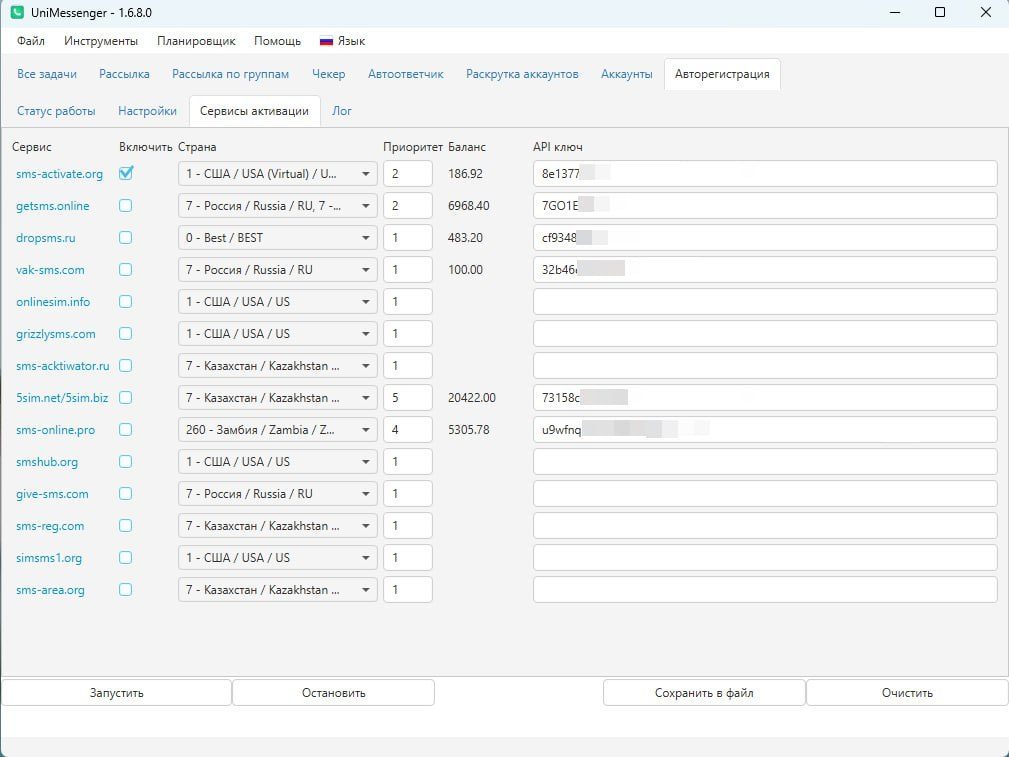
"Activation services" on the Auto-registration tab
1) Enter the API key for the services you use. If the data was entered correctly, the balance will update. 2) Tick the services you plan to work with. 3) Set priority for the services — if the program has any issues with the 1st service in the list, it will move to the next, and so on in a circle. Priority is assigned automatically in the order you tick services. The order can also be changed manually. 4) Pick the countries whose numbers will be used to register accounts.
"Settings" on the Auto-registration tab
1) Pick which emulator you will use. For more on emulator selection and settings, see here. 2) Fill in the settings on the "Basic" tab. Specify the work mode, account type, and how many to register. 3) Specify the templates folder on the "Accounts" tab. All names and any text must be Latin (English letters). You can set a PIN code, image, status, and privacy for the avatar. 4) Configure timeouts. Timeouts and time are specified in ms — 60000 is 60 seconds. 5) Use other settings as needed:
- Proxy. More: Working through a proxy.
- Blacklist and number-mask blacklist.
- Call. After a successful registration, accounts will make a call to the numbers specified in the file. You can set the time, count, and type of calls.
- Captcha — enter the API key for captcha. During WhatsApp registration a captcha can appear after the phone is entered; the RuCaptcha service is used for automatic solving.
- Other. Reinstall WhatsApp, run requests, restart the emulator, save a screenshot on registration error.
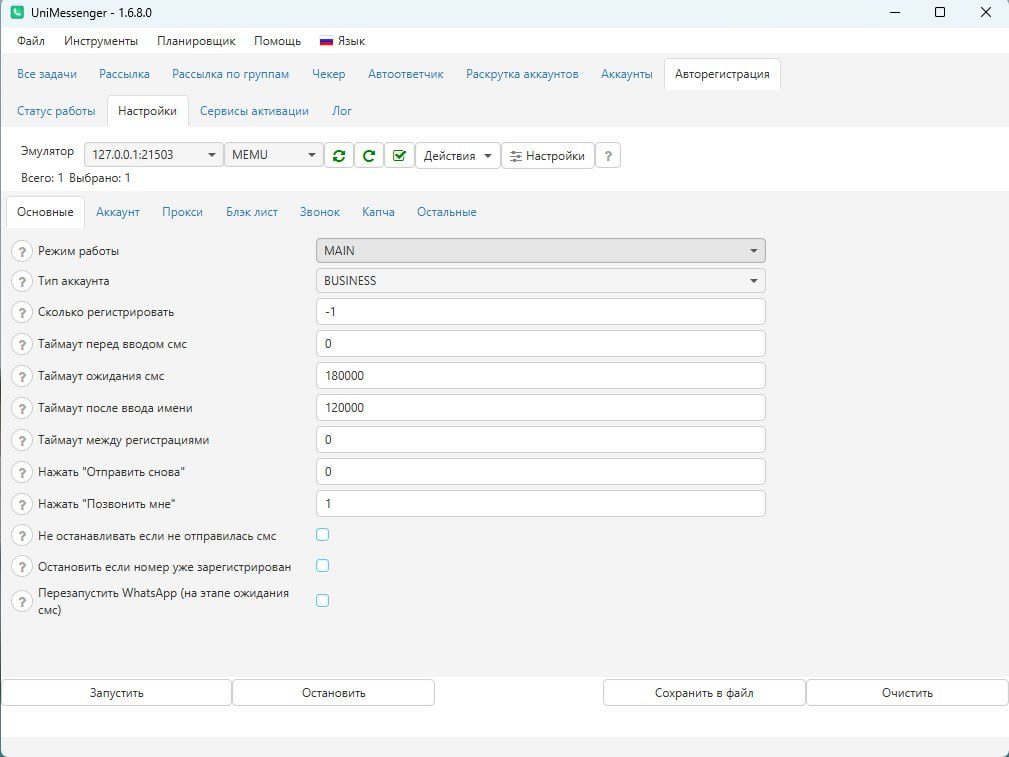
"Basic"
- Work mode: MAIN — the main mode, accounts are registered and saved to the program. SAVE_SMS_TO_FILE — registration doesn't finish and accounts aren't saved to the program. Registration runs up to the moment the SMS is received; after that the phone number and the SMS are saved to a file in the UniMessenger/Export folder, and a new registration begins.
- Account type: WHATSAPP — a regular account through the main WhatsApp app. BUSINESS — a business account through WhatsAppBusiness.
- How many to register — by default set to no limit (-1). The specified number of accounts must be a multiple of the number of emulators — for example, if you have 2 emulators, the account count should be 2, 8, 20, and so on.
- Tap "Resend" — the "Resend" or "Request SMS again" button will be tapped after the specified time.
- Tap "Call me" — the "Call me" or "Request call again" button will be tapped after the specified time.
- Don't stop if SMS wasn't sent — for call activation. If disabled, in the normal mode: when after entering the number a message appears that the SMS couldn't be sent, registration ends and a new number is taken. If enabled: the program will wait for the code.
- Stop if the number is already registered — disabled by default. If enabled: after entering the number and getting a message that the number is already registered on WhatsApp, the program cancels the registration (ALREADY_REGISTERED) and takes the next number. This happens, for example, when registering on WhatsApp Business while the number is already registered on WhatsApp.
- Import contacts — before every registration, 30–60 contacts will be added to the contacts; the numbers are generated depending on the number being registered.
- Restart WhatsApp (at the SMS-wait stage) — can shorten the time needed to request a repeat SMS or call.
"Accounts"
- Templates folder — the folder that must contain: a names file — "names.txt", one name per line; a statuses file — "status.txt", one status per line; an "Avatars" folder with avatar images — a random one will be picked each time. All names and any text must be Latin (English letters).
- Set photo (settings → profile) / Set photo (right after the SMS is entered) — only one of these checkboxes should be enabled. Photos are taken from the "Avatars" folder, a random one each time.
- Set status — a text status (info) is set, taken from "status.txt" in the templates folder.
- Set privacy (photo) — privacy setting for profile photo visibility = nobody.
"Blacklist"
- Use blacklist for numbers — every time the program takes a number from the SMS service, it is added to an automatically created file: "UniMessenger/data/autoreg_phones_bl.txt", which can be cleared manually if needed.
- Number-mask blacklist — masks are listed one per line; if the number received from the SMS service matches a mask, it is canceled and the program takes the next one. For example, mask 7 — all numbers starting with 7 (7912..., 7950..., etc.).
"Other"
- Reinstall WhatsApp — disabled by default = 0. Specifies after how many registrations to reinstall WhatsApp. You need to download the current .apk versions and copy them into the "UniMessenger/data/Apk" folder. Download links here.
- Run GET request(s) after registration — list one per line. Can be bound to a device — the request will run only after registration on the specified device.
- Run request only after N registration attempts — if a value is set, the program will run requests only after the specified number of registration attempts. To disable, clear the field or set 0 — the request will run after every registration attempt.
- Restart the emulator — will restart after every registration. The identifiers and device will also change.
- Save screenshot on registration error — enabled by default. Screenshots are saved to ".../Export/AutoregScreenshots".
Video instructions
Watch the video here.